Are you a cat person or a dog person?
If you would have asked me that question four years ago, I would have unequivocally said:
Dogs!
And I will ashamedly admit, that I would have scoffed at those who call themselves cat people, mr gasket included. Because I. just. didn’t. get. cats. They just seemed to either a) sit there, or b) FREAK OUT! Neither of which seemed to be endearing features of a furry companion.
So when we inherited Maxi, mr gaskets family cat, who miraculously appeared after 10 months on the run, we became a cat household. I was supportive of Maxi coming to live with us, on the proviso that he NEVER runs away again (mr gasket was sad when Maxi decided to leave home and didn’t to tell anyone where he was going).
A year later we adopted Ralphi, his mum was a feral bogan free spirit who had given birth in someone’s back yard. Luckily the backyard belonged to a Vet’s assistant who promptly scooped up Ralphi and his brother’s and sisters, and found them homes, ours being one of them. Again, I was supportive, but I was afraid to death of the stigma, you know, of being a two cat household.
Fast forward to today, me, mr gasket, Maxi and Ralphi are happy like pigs in … mud ;) and so I dedicate my first original tutorial to my two mates, who a) sometimes DO just sit there b) sometimes do FREAK OUT, but c) I NOW. do. get.
Crochet cat headband
*lots of picures!*
Materials:
1 x main colour 8ply wool
1 x contrast colour of 8ply wool
4.0mm crochet hook
Wool needle
Hobby fill
Glue gun
Plastic headband
Ear (create two)
Using main colour, create a magic loop. To create a magic loop, wrap main colour wool around your three middle fingers, then wrap a second and thrid time around only your middle and ring finger.
Secure the magic loop by hooking the large hoop and pulling underneath the two small hoops, to create a single chain. Hook the large loop again and pull through the single chain.
Now make five double crochets into the magic loop.Tighten the magic loop by slowly pulling on the loop closest to the end of the wool (you will notice that the other magic loop starts to close), and continue to pull until the other magic loop is completely closed.
Slip stitch into the first double crochet, and this is your first row/round.
Row 2: chain one, two single crochets in first stitch, then a single crochet in the next two stitches, two single crochets in the next stitch, then a single crochet in the next two stitches, then slip stitch into the first stitch to close the loop.
Row 3: chain one, two single crochets in first stitch, then a single crochet in the next three stitches, two single crochets in the next stitch, then a single crochet in the next three stitches, then slip stitch into the first stitch to close the loop.
Row 4: chain one, two single crochets in first stitch, then a single crochet in the next four stitches, two single crochets in the next stitch, then a single crochet in the next four stitches, then slip stitch into the first stitch to close the loop.
Row 5: chain one, two single crochets in first stitch, then a single crochet in the next five stitches, two single crochets in the next stitch, then a single crochet in the next five stitches, then slip stitch into the first stitch to close the loop.
Row 6: chain one, two single crochets in first stitch, then a single crochet in the next six stitches, two single crochets in the next stitch, then a single crochet in the next six stitches, then slip stitch into the first stitch to close the loop.
Row 7: chain one, two single crochets in first stitch, then a single crochet in the next seven stitches, two single crochets in the next stitch, then a single crochet in the next seven stitches, then slip stitch into the first stitch to close the loop. Cut end and cast off.
Inner ear (create two)
Using the contrast colour, create a magic loop. Chain two, then make two double crochets into the magic loop, (three chain, then three double crochets into the magic loop) twice. Cut end and cast off. the shape should resemble a flat triangle.
Make-up
Cut 20cm skein of contrast wool, and using a wool needle, hand sew one inner ear to the front of the main ear, starting at the bottom opening. Repeat for other ear.
Grab a small handful of hobby fill, and gently fill the inside of the main ear, but not too full that the front and back of the main ear cant be closed. Repeat for other ear. Cut a 20cm skein of main wool, and using wool needle, hand sew the front and back of the main ear closed, keeping as much of the hobby fill on the inside as possible.
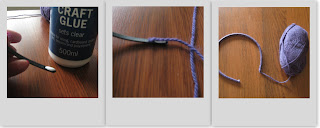
Squeeze a small drop on the inside of one of the headband ends, and place the tip end of the main wool onto the glue. When it safe to touch, gently push the tip end of the wool into glue, and beginning from the bottom, wind the wool around the headband. Once you get to the other end of the headband, cut the wool from the ball, squeeze a small drop of glue on the inside of the headband end, and when it is safe to touch, push the tip end of the wool into the glue. Trim any excess.
*yes that is craft PVA glue in the picture, but a hot glue gun works better
Cut a 30cm skien of main wool, and using a wool needle, attach the wool to the bottom front left of one of the ears. Decide how far apart/close together you would like each ear to be, then begin to hand sew the ear around the headband, working from front to back, then around to the front again, making sure to gently pull tight each time you pull the needle through the ear. Repeat until you get to the end of the ear.
I wanted a small gap in between each ear at the top, so I just wound the wool around the headband until I was ready to attach the next ear (this also saves you from cutting the wool and then reattaching it to the next ear).
Hand sew the other ear around the headband from front to back until you get to the end. Knot, then sew in the end.
And here is the end result:
Meow!
Oh, and for the record I consider myself neither a dog person or a cat person. I consider myself to be a neutral middleground on the fence Switzerland person. Leave me a comment on what you consider yourself to be!
xoxo Bronwyn


