Monday, April 30, 2012

Mad Hatter Tea Party Baby Shower

Last week I had my Mad Hatter Tea Party Baby Shower, and I had a blast.


In the weeks prior to the baby shower, I was on Google, Pinterest, Ravelry, Etsy, (everything!), looking for inspiration and ideas on how to make it a fun afternoon for everyone. I made all the decorations, including a Mad Hatter bunting, crochet love heart garland, paper flowers, Cheshire cat tail, and This Way signs, so that my family and friends could get a wonderland feel about the party.


I even found this guy during the after Easter sales, perfect for those need to "follow the white rabbit.”


For food, we had cupcakes, biscuits, slices, jam tarts, cheese platter, sausage rolls, dips, veggie sticks, and cake, most of which was gobbled up at the party.


And I can’t forget the tea, hot and iced, mr gasket even bought me a brand new tea pot just for the party!


I asked everyone to wear a hat during the baby shower (and to my surprise most people did), and even more impressively, a lot of the party go-ers made their own hats, nice work people! I made my own hat, and I also made a few back-up hats in case anyone forgot to bring theirs.

Yes, two decks of cards and two Alice in Wonderland books were harmed in the making of this hat.

Overall I had a great time, although I didn’t get to mingle as much as I’d like to, and my good friend did an amazing job at hosting all the games, which including Price is Right, Everything Baby A-Z, and Baby Shower Bingo. The baby got lots of beautiful, fun and practical things, it makes me feel really blessed to have such wonderful and generous people in my life.


I had so much fun with this themed tea party baby shower, I’m already thinking of the next themed party to have … maybe for the baby’s first birthday … but mr gasket thinks I might be getting a bit off with your head ahead of myself.

Let me know what you think of my baby shower, or let me know about the best themed party you hosted/attended!

xoxo Bronwyn

Tuesday, April 17, 2012

Crochet cat headband (Tutorial)

Are you a cat person or a dog person?

If you would have asked me that question four years ago, I would have unequivocally said:

Dogs!

And I will ashamedly admit, that I would have scoffed at those who call themselves cat people, mr gasket included. Because I. just. didn’t. get. cats. They just seemed to either a) sit there, or b) FREAK OUT! Neither of which seemed to be endearing features of a furry companion.

So when we inherited Maxi, mr gaskets family cat, who miraculously appeared after 10 months on the run, we became a cat household. I was supportive of Maxi coming to live with us, on the proviso that he NEVER runs away again (mr gasket was sad when Maxi decided to leave home and didn’t to tell anyone where he was going).


A year later we adopted Ralphi, his mum was a feral bogan free spirit who had given birth in someone’s back yard. Luckily the backyard belonged to a Vet’s assistant who promptly scooped up Ralphi and his brother’s and sisters, and found them homes, ours being one of them. Again, I was supportive, but I was afraid to death of the stigma, you know, of being a two cat household.


Fast forward to today, me, mr gasket, Maxi and Ralphi are happy like pigs in … mud ;) and so I dedicate my first original tutorial to my two mates, who a) sometimes DO just sit there b) sometimes do FREAK OUT, but c) I NOW. do. get.

Crochet cat headband

*lots of picures!*


Materials:

1 x main colour 8ply wool
1 x contrast colour of 8ply wool
4.0mm crochet hook
Wool needle
Hobby fill
Glue gun
Plastic headband

Ear (create two)
Using main colour, create a magic loop. To create a magic loop, wrap main colour wool around your three middle fingers, then wrap a second and thrid time around only your middle and ring finger.


Secure the magic loop by hooking the large hoop and pulling underneath the two small hoops, to create a single chain. Hook the large loop again and pull through the single chain.


Now make five double crochets into the magic loop.Tighten the magic loop by slowly pulling on the loop closest to the end of the wool (you will notice that the other magic loop starts to close), and continue to pull until the other magic loop is completely closed.


Slip stitch into the first double crochet, and this is your first row/round.


Row 2: chain one, two single crochets in first stitch, then a single crochet in the next two stitches, two single crochets in the next stitch, then a single crochet in the next two stitches, then slip stitch into the first stitch to close the loop.
Row 3: chain one, two single crochets in first stitch, then a single crochet in the next three stitches, two single crochets in the next stitch, then a single crochet in the next three stitches, then slip stitch into the first stitch to close the loop.
Row 4: chain one, two single crochets in first stitch, then a single crochet in the next four stitches, two single crochets in the next stitch, then a single crochet in the next four stitches, then slip stitch into the first stitch to close the loop.


Row 5: chain one, two single crochets in first stitch, then a single crochet in the next five stitches, two single crochets in the next stitch, then a single crochet in the next five stitches, then slip stitch into the first stitch to close the loop.
Row 6: chain one, two single crochets in first stitch, then a single crochet in the next six stitches, two single crochets in the next stitch, then a single crochet in the next six stitches, then slip stitch into the first stitch to close the loop.
Row 7: chain one, two single crochets in first stitch, then a single crochet in the next seven stitches, two single crochets in the next stitch, then a single crochet in the next seven stitches, then slip stitch into the first stitch to close the loop. Cut end and cast off.


Inner ear (create two)
Using the contrast colour, create a magic loop. Chain two, then make two double crochets into the magic loop, (three chain, then three double crochets into the magic loop) twice. Cut end and cast off. the shape should resemble a flat triangle.


Make-up
Cut 20cm skein of contrast wool, and using a wool needle, hand sew one inner ear to the front of the main ear, starting at the bottom opening. Repeat for other ear.


Grab a small handful of hobby fill, and gently fill the inside of the main ear, but not too full that the front and back of the main ear cant be closed. Repeat for other ear. Cut a 20cm skein of main wool, and using wool needle, hand sew the front and back of the main ear closed, keeping as much of the hobby fill on the inside as possible.


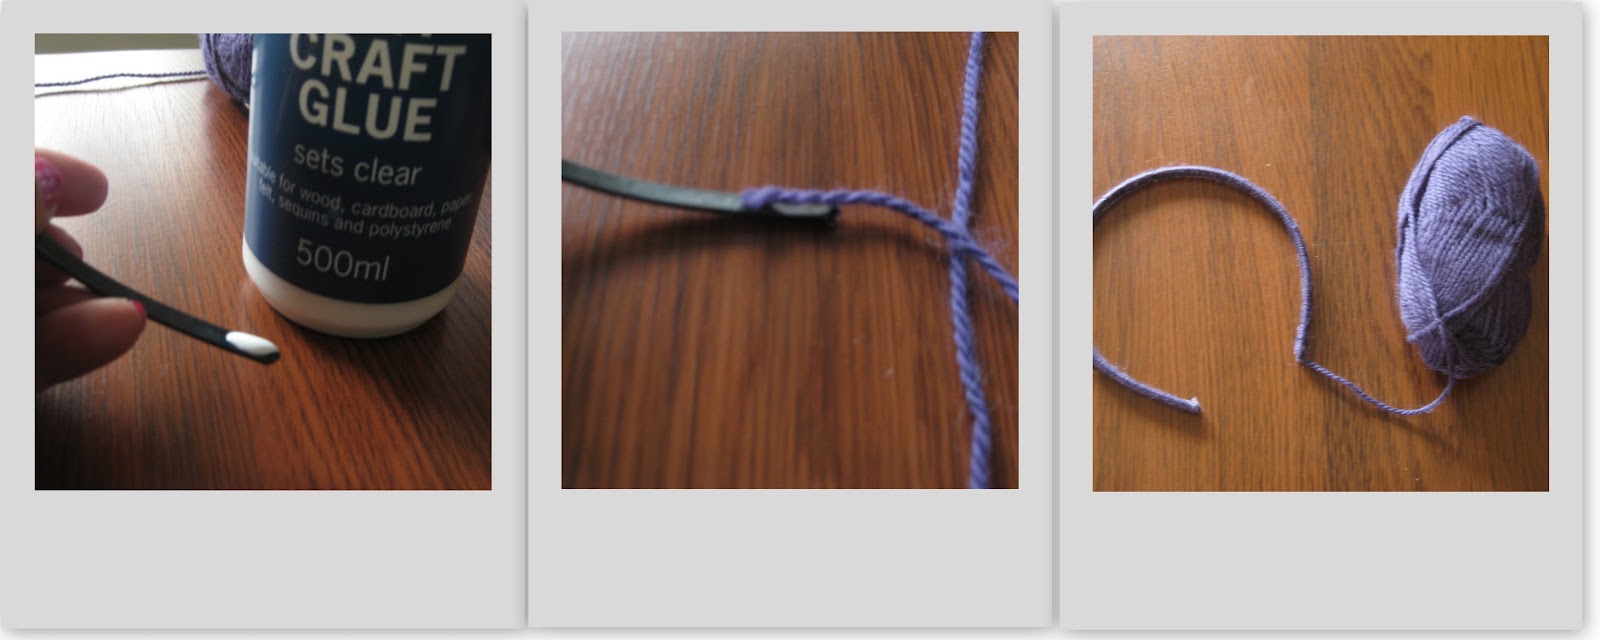
Squeeze a small drop on the inside of one of the headband ends, and place the tip end of the main wool onto the glue. When it safe to touch, gently push the tip end of the wool into glue, and beginning from the bottom, wind the wool around the headband. Once you get to the other end of the headband, cut the wool from the ball, squeeze a small drop of glue on the inside of the headband end, and when it is safe to touch, push the tip end of the wool into the glue. Trim any excess.

*yes that is craft PVA glue in the picture, but a hot glue gun works better

Cut a 30cm skien of main wool, and using a wool needle, attach the wool to the bottom front left of one of the ears. Decide how far apart/close together you would like each ear to be, then begin to hand sew the ear around the headband, working from front to back, then around to the front again, making sure to gently pull tight each time you pull the needle through the ear. Repeat until you get to the end of the ear.


I wanted a small gap in between each ear at the top, so I just wound the wool around the headband until I was ready to attach the next ear (this also saves you from cutting the wool and then reattaching it to the next ear).


Hand sew the other ear around the headband from front to back until you get to the end. Knot, then sew in the end.

And here is the end result:


Meow!

Oh, and for the record I consider myself neither a dog person or a cat person. I consider myself to be a neutral middleground on the fence Switzerland person. Leave me a comment on what you consider yourself to be!

xoxo Bronwyn

Wednesday, April 11, 2012

Pattern Review: Crochet Heart Bunting

My grandma recently came to visit from South Africa after the birth of my cousin’s baby. And since all I’ve been doing these days is counting down the weeks until baby arrives (5 weeks and 6 days to be exact), I made it my mission to spend as much time as I could with her, and soak up all of her grandma-y wisdom.

So while we were having some of the most amazing conversations, laughs and the occasional scandalising, my grandma kept herself busy by knitting (spoiling me) with some of the most beautiful things for the baby. It inspired me to dust off the crochet hooks and do some crocheting of my own.

I found a crochet love heart tutorial on the craft blog, Planet June, and I knew I just had to try it. I can’t believe how easy and fast they are to create. I’m no crochet master, but I think I will put this tutorial in easy basket.

But what am I going to do with some many crochet hearts?


Make crochet heart bunting!

All I did was cast on fifteen stiches, then single crochet at the top of the heart bump, cast on another five stitches, single crochet at the top of the next bump, then cast on another eight stitches before attaching the next heart.


I plan to use the crochet heart bunting very soon, but it’s a surprise, but I can see myself using this bunting to decorate the house during the Valentines Day, anniversaries, or anytime I need some love.

Leave me comment to let me know what you think!

xoxo Bronwyn

P.S. It is day eleven of no TV for a month, and I must admit, it is pretty easy not to watch TV

Wednesday, April 4, 2012

Weekend warrior: Baby Shows and Marathons

Wow!

What an amazing weekend! So many great things were happening this weekend, and I was lucky enough to attend all of them.

It all started Friday when I went to the Baby and Toddler Show. I will admit, I went into this show with very very low expectations. It’s not that I didn’t want to go, or that I wasn’t interested (it was quite the opposite in fact), but I have been to shows in the past (think: bridal, first home owners and home improvement), and they were kind of boring. Millions of stands/vendors handing out brochures and selling expensive services and products. Whenever I have gone to these shows I leave with bags and bags of reading materials, which inevitably get thrown away, and with the idea that I can make/do it myself, instead of purchasing from the vendors.

But the Baby and Toddler Show was different.

There was heaps and heaps of free competitions, there were heavily discounted new products for sale, free advice and lots of goody bags with samples and freebies. The show had a treasure hunt app, so I played along and won these cool zip lock bags (I *heart* tresure hunts!). I will definitely be marking the date in my calendar for next year.


And then yesterday I did something that was going to test my endurance and stamina. Something a lot of so and so’s said,

“You can’t do that you’re pregnant.”

No, I’m not talking about Tough Mudda (although a few of my friends did it and had an amazing experience), I’m talking about the Run for the Kids, the fun run/walk for that’s associated with the Royal Children’s Hospital Good Friday Appeal. Mr gasket's work has doing the run for the last few years, so he decided that this year it would be a good idea to register himself and his seven month pregnant wife (umm, ok…)

It was the first time mr gasket and I have done something like this together, and during the run/walk we were already talking about who would be pushing the pram at next year’s race.

Here is the proof:


My goals for the race include:
1. Finish the run/walk
2. Finishing the 5.4km run/walk in less than 1.5 hours,
3. Finish the race before it starts to rain
4. Finish the race before the 14.38km marathon run finishes

Here are my results:
1. Finished the run/walk
2. Finished the run/walk in 01:04:33
3. It didn’t rain
4. Finished the run/walk 20 minutes before Martin Dent, the first male marathon runner, crossed the finish line (and even got to watch him cross the line)

Snaps for girlie!

Have you ever done a charity walk/run, or done something that someone said you can’t do? Let me know by leaving a comment!

xoxo Bronwyn

P.S. For the clever people out there, completing a 5km run is on my Mrs Bucket list, however, I’ve decided not to cross it off because, I didn’t actually run the Run for the Kids.

P.P.S But speaking of my Mrs Bucket list, I know I have only crossed off one thing on my list, but this month I’ve decided to knock off as many things on my list as possible, starting with #23 Go without TV for a month. The rules are no watching TV or movies on the TV or streaming TV shows online (yes I know, I’m hardcore).
Related Posts Plugin for WordPress, Blogger...