Wednesday, April 11, 2012

Pattern Review: Crochet Heart Bunting

My grandma recently came to visit from South Africa after the birth of my cousin’s baby. And since all I’ve been doing these days is counting down the weeks until baby arrives (5 weeks and 6 days to be exact), I made it my mission to spend as much time as I could with her, and soak up all of her grandma-y wisdom.

So while we were having some of the most amazing conversations, laughs and the occasional scandalising, my grandma kept herself busy by knitting (spoiling me) with some of the most beautiful things for the baby. It inspired me to dust off the crochet hooks and do some crocheting of my own.

I found a crochet love heart tutorial on the craft blog, Planet June, and I knew I just had to try it. I can’t believe how easy and fast they are to create. I’m no crochet master, but I think I will put this tutorial in easy basket.

But what am I going to do with some many crochet hearts?


Make crochet heart bunting!

All I did was cast on fifteen stiches, then single crochet at the top of the heart bump, cast on another five stitches, single crochet at the top of the next bump, then cast on another eight stitches before attaching the next heart.


I plan to use the crochet heart bunting very soon, but it’s a surprise, but I can see myself using this bunting to decorate the house during the Valentines Day, anniversaries, or anytime I need some love.

Leave me comment to let me know what you think!

xoxo Bronwyn

P.S. It is day eleven of no TV for a month, and I must admit, it is pretty easy not to watch TV

Wednesday, April 4, 2012

Weekend warrior: Baby Shows and Marathons

Wow!

What an amazing weekend! So many great things were happening this weekend, and I was lucky enough to attend all of them.

It all started Friday when I went to the Baby and Toddler Show. I will admit, I went into this show with very very low expectations. It’s not that I didn’t want to go, or that I wasn’t interested (it was quite the opposite in fact), but I have been to shows in the past (think: bridal, first home owners and home improvement), and they were kind of boring. Millions of stands/vendors handing out brochures and selling expensive services and products. Whenever I have gone to these shows I leave with bags and bags of reading materials, which inevitably get thrown away, and with the idea that I can make/do it myself, instead of purchasing from the vendors.

But the Baby and Toddler Show was different.

There was heaps and heaps of free competitions, there were heavily discounted new products for sale, free advice and lots of goody bags with samples and freebies. The show had a treasure hunt app, so I played along and won these cool zip lock bags (I *heart* tresure hunts!). I will definitely be marking the date in my calendar for next year.


And then yesterday I did something that was going to test my endurance and stamina. Something a lot of so and so’s said,

“You can’t do that you’re pregnant.”

No, I’m not talking about Tough Mudda (although a few of my friends did it and had an amazing experience), I’m talking about the Run for the Kids, the fun run/walk for that’s associated with the Royal Children’s Hospital Good Friday Appeal. Mr gasket's work has doing the run for the last few years, so he decided that this year it would be a good idea to register himself and his seven month pregnant wife (umm, ok…)

It was the first time mr gasket and I have done something like this together, and during the run/walk we were already talking about who would be pushing the pram at next year’s race.

Here is the proof:


My goals for the race include:
1. Finish the run/walk
2. Finishing the 5.4km run/walk in less than 1.5 hours,
3. Finish the race before it starts to rain
4. Finish the race before the 14.38km marathon run finishes

Here are my results:
1. Finished the run/walk
2. Finished the run/walk in 01:04:33
3. It didn’t rain
4. Finished the run/walk 20 minutes before Martin Dent, the first male marathon runner, crossed the finish line (and even got to watch him cross the line)

Snaps for girlie!

Have you ever done a charity walk/run, or done something that someone said you can’t do? Let me know by leaving a comment!

xoxo Bronwyn

P.S. For the clever people out there, completing a 5km run is on my Mrs Bucket list, however, I’ve decided not to cross it off because, I didn’t actually run the Run for the Kids.

P.P.S But speaking of my Mrs Bucket list, I know I have only crossed off one thing on my list, but this month I’ve decided to knock off as many things on my list as possible, starting with #23 Go without TV for a month. The rules are no watching TV or movies on the TV or streaming TV shows online (yes I know, I’m hardcore).

Tuesday, March 20, 2012

Tips & Tricks: Organised bed linen

Do you have a linen closet at your house?

Well boo, so jealous.

My house doesn’t have one, so for the past four years we have kept our linen on the top shelf of one of the spare bedrooms. The only problem with the top shelf is that sometimes when you pull one thing out, other things fall down. Or when one of the pillow cases becomes separated from everything else, you end up taking out the entire wardrobe more items just to find the item you’re originally looking for. And before you know it, all your linen is on the floor looking like this:


So when I came across this simple way of organising bed linen on Pinterest, I just knew this was the solution I was looking for. (N.B and in the interest of not being sued the original source comes from Martha Stewart).

It’s such a simple, practical idea it’s funny that not everyone does this (or do you?) First, get all items of a sheet/quilt set together and fold them (you probably do this already). Get one of the pillowcases and put the entire set inside the pillowcase. Now all items belonging to this sheet/quilt set, are all together. Easy.

So my mess linen went from this:


to this:


Thanks Martha!

xoxo Bronwyn

Monday, March 12, 2012

Pattern Review: Bubba Booties

Recently when someone asked me,

“Have you made anything for the baby yet?”

They were shocked, horrified, appalled, puzzled by my “No” response.

It’s not surprising, I do enjoy making handmade things, and at every single baby shower I’ve ever been to, I have included something handmade. I have wanted to make something for the baby, in fact I’ve been dying to make something, but I’ve just been:

a) distracted by all the other bills purchases for the baby
b) getting bored with gender neutral colours (white, beige, brown)
c) too excited on what to make first
d) all of the above

So since it’s a long weekend, I decided to make some booties from my good ol’ Patons Quick & Easy Baby Knits #6000


And here is the end result:


This was my first time making booties, and I love them! I especially loved making the twisted cord for the ties, they look difficult, but were so simple, I really like how the grey and aqua mesh well together. The booties are imperfect, and mr. gasket says one bootie looks bigger than the other, but even if they are flawed, I still think they are precious.

The grey wool is the Spotlight brand 8 ply pure wool, and the aqua wool is some scrap 8 ply wool I had lying around (possibly Patons?)

I’m so amazed at my awesomeness that I have signed up to ravelry, an online social network of knitters, crocheters, weavers, and spinners who share their projects, review patterns and give wool help to the needy (yes please!). If you’re already on ravelry, come and be my friend, I’m gasketsforgirlies.

Anyway, here is another picture of the booties.


(This picture does make one look bigger than the other)

xoxo Bronwyn

P.S. on a silly side note, my theme song while knitting this project was Flo Rida “Turn Around (5 4 3 2 1)”. Leave me a comment if you can guess why!

Tuesday, March 6, 2012

Holiday Snapshot: Babymoon in Hawaii

Aloha!

Sorry for the absence, but I’ve just returned from a two week babymoon in Hawaii.

What is a babymoon you ask?


Well, depending on who you ask or where you come from, a babymoon can be one of three things:

1) A holiday that you and your partner take together in the hopes of creating a baby
2) The first holiday you and your partner take together as a family, after the birth of your new baby
3) The last holiday (but not your last EVER holiday) that you and your partner take before the birth of your baby

As you can probably guess, my babymoon was number three:

3) The last holiday (but not your last EVER holiday) that you and your partner take before the birth of your baby

As mr. gasket and I went to Hawaii for our honeymoon, it seemed appropriate to go back there for our babymoon. The weather was perfect - not too hot, not too humid, and not too rainy – ideal for this girly.

So here are a couple of my Hipstamatic app pictures for your enjoyment!


Mahalo!

xoxo Bronwyn

P.S check out these beautiful Moda charm squares I ordered with free delivery on eBay. I’m going to use them for something on my Mrs Bucket List, can you guess what?

Monday, February 6, 2012

Revamp: Tank top with ruffles tutorial

I love a bargain. I mean, really, really LOVE a bargain.

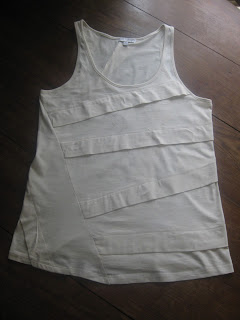
So when I saw that this cream long length tank top was only $5 at a factory warehouse sale, I had to have it.


The only problem with the tank top is that even with the diagonal detailing, it was still a bit boring for my liking and it needed a bit somethin’ somethin’.

So introducing, the tank top with ruffles tutorial.


Materials:

1 x boring tank top
Measuring tape
Cutting Mat
Scissors or rotary cutter
Fabric
Thread
Sewing Machine
Pins

Lay the tank top on a flat surface. I decided the best place to add my ruffled fabric is along the existing diagonal seams. Using a measuring tape, measure the length of where you want you ruffled fabric to start and finish. My seam measured 39cm. If you want the ruffled fabric to go the along the entire seam, you would double it. I only wanted the ruffled fabric to go half the length, so this piece of ruffled fabric, only needed to be 39cm.

Next cut the fabric by the length above, by your desired width. You can cut your fabric to any width, but I chose 5cm because that was the same width as the detailing on the tank. I also chose a polyester/cotton Gingham, but a 100% cotton fabric would work just as easily, so my fabric dimensions were 39cm by 5cm.


I wanted raw seams with some fraying, but not so much fraying that it would make a mess in my washing machine. So set your sewing machine to zig zag, and leaving a ½ cm gap edge, sew all the way around the fabric. If you want to avoid fraying, zig zag along the very edge of the fabric, or if you have an overlocker, stitch along the edge.


Next you need to set up the sewing machine to create the ruffles. The easiest way to do this is to first set your machine to a straight stitch. Next, set the machine to the longest stitch, for me it was 4. Then, you need to set your machine to the tightest tension, for my machine it was 9.

Leaving plenty of thread at the beginning, locate the middle length of the fabric (just eyeball it) and then slowly sew along the middle of the fabric. It should look like this:


Once you get to the end of the fabric, stop sewing and pull the fabric from behind the machine and cut, ensuring you leave plenty of thread at the end.

If the ruffles are too tight, gently pull the thread, and push the fabric outwards to the end, making sure not to break the thread.

If the ruffles are too loose, gently pull the thread, and push the fabric inwards to the middle, again making sure not to break the thread.

Once the ruffles are the desired length, position the ruffled fabric onto the tank top with sewing pins. After the fabric is fixed in place, readjust your stitch length and tension for a normal straight stitch, and stitch along the middle (where you just stitched to created the ruffles), pulling out the pins as required, and making sure you double back the start and finish.


I then repeated the process to make additional ruffled fabric, and here is the end result.


Not so boring now, huh? Let me know what you think of my first revamp tutorial in the comments!

xoxo Bronwyn

Thursday, February 2, 2012

My Mrs Bucket (pronounced Bou-quet) List

Have you heard of a 365 project?

If you haven’t, you should. I first heard about it a few years ago when a TV personality decided to take a quirky picture of himself every day for a year, and once he was done, he held an exhibition. I thought that this was an awesome idea and great way to waste time add more things to my busy day.

But after I did a bit more digging, I found out about 365 grateful. This is where people document (and take photos) of something they are grateful for everyday. I like this idea much more. And so for the last two years I’ve told myself, “You’re going to start your 365 project on 1 January,” but then every year I forget. I don’t have to start on 1 January, but it just seems like the best way to start a new year.

So while I wait 332 days until next year, I’ve decided to do a 30 before I’m 30 bucket list instead, or a Mrs Bucket (Bou-quet) list as my grandma likes to call it. Check it out!

Bronwyn’s 30 before 30 Mrs Bucket List:


1) Have a Baby
2) Make a (proper) quilt
3) Participate in a 5km (or ambitious 10km) run
4) Learn a new language
5) Ride on the Portsea to Queenscliff ferry
6) Read a book that is at least 500 pages in a single session, start to finish
7) Learn how to shuffle (LMFAO style)
8) Attend a Bikram Yoga class
9) Watch the entire Harry Potter movie series
10) Play 18 holes of golf
11) Learn to play the ukulele
12) Memorise the lyrics of a rap song
13) Fail, then try again
14) Learn to use a dSLR camera
15) Forgive the selfish, the insensitive and the hurtful
16) Go to a live recording of a TV show
17) Hike a big mountain for at least 5 hours
18) Attend the opera
19) Make 1000 origami paper cranes
20) Start a blog
21) Visit Tasmania
22) Grow my own herbs
23) Go without TV for a month
24) Dye (part of) my hair purple
25) Pay it forward – by either buying a stranger coffee, paying for a strangers meal in the drive thru, or taping exact change for a can of soft drink to a vending machine
26) Try stand up paddle boarding
27) Write at least 30 thank you letters to waiters, sales people, customer service reps
28) Get a tattoo
29) Go zorbing
30) Purposely leave 30 x one dollar coins on the ground

Now if you Google ideas for 30 before your 30, you will find a lot more physical feats, such as jumping out of a plane, or bungee jumping. And you will also find a lot of travel feats such as, walking the Great Wall of China, or climbing Mt Kilimanjaro. But since I am seriously time constrained with a) being 5 months pregnant and b) turning 30 in 30 weeks (what a coincidence!) I’ve had to soften the things that made the list.

But before I get any comments of, “you cant do such in such because you’re pregnant,” Frankie says relax, and don’t worry I haven’t forgotten. I couldn’t make everything on the list easy, I like a challenge, and I always perform better under pressure, so those things, such as Bikram yoga and getting a tattoo, will have to wait until after the baby comes, but before my birthday.

But since I like to be organised, I think I need some back-ups, just in case I cant complete some things on my list such as zorbing. My friends went to the Philippines last year and did it there, and I know you can go zorbing in New Zealand too, but does anyone know if I can do this Melbourne?

So give me your ideas in the comments on some back-ups that I should consider, or let me know what’s on your bucket list!

xoxo Bronwyn

P.S I can already cross off one item on my list, this blog!

20) Start a blog

Don’t you just love crossing things off your list? Now its 29 things to do in 30 weeks!
Related Posts Plugin for WordPress, Blogger...